UPDATE 2016-10-14: A more polished version of this article can now be found on the Official Red Hat CloudForms Blog.
Most systems are using Access Control LIsts (ACL) to manage user access to objects. Common examples are ACL’s for file systems, LDAP, Web Servers and many more. Who ever had to create ACL rules and maintain them knows how complicated this can be. To make access control easy again, CloudForms and ManageIQ are using tags. If the group a user belongs to has the same tag associated as the accessed object, access is granted, if not, access is denied.
Sounds simple and straight forward. There are a couple of things to know about tags, which make it very powerful, but using them also a bit tricky. Let’s start with some basics.
-
User: users can be created in the internal database or are retrieved from external authentication (LDAP, Active Directory, IPA/RH Identitiy Manager which is part of Red Hat Enterprise Linux). Meta data including the full name, the email address, the password (in case of database authentication) and a relationship to one or more groups
-
Groups: every user is a member of one or more groups (if the internal database is used for authentication, users can only be a member of one group)
-
Roles: every group is associated to exactly one role which describes the granted privileges
-
Tenants: multiple tenants can be used to separate slices of the infrastructure. Tenants could be external customers, internal departments or project teams.
Groups are used to define the scope or visibility of a user. For example, a member of the Engineering Department can be granted access to all VMs owned by the Engineering Department. Or an operator could be a member of the group Operations and be granted access to all VMs running in the production environment.
Roles are used to define which actions a user is allowed to perform. For example, an operator role could define all actions needed for an operator. This could include permissions to start or stop virtual machines, reconfigure them etc. A role “self service user” could allow a user to order new VMs and manage them.
The combination of groups and role defines which actions are allowed for which object. An operator in the Engineering Department would have the same privileges as an operator in the Finance Department (because they share the same role), but they would still see different objects (because they are not in the same group).
Let’s discuss a couple of examples to get familiar with the model.
Setting the stage
For the following exercises the internal database authentication has been used. That limits the examples to the restriction of one user is always in exactly one group. If a more flexible model is needed, where a user can be a member of multiple groups, an external authentication source like LDAP, Active Directory or FreeIPA (Red Hat Identity Manager) has to be used. But let’s keep it simple.
The way the user interface is designed, it makes sense to start with the role, then create the group and finally the user. Let’s keep tenants for later.
Example Role “Self Service”
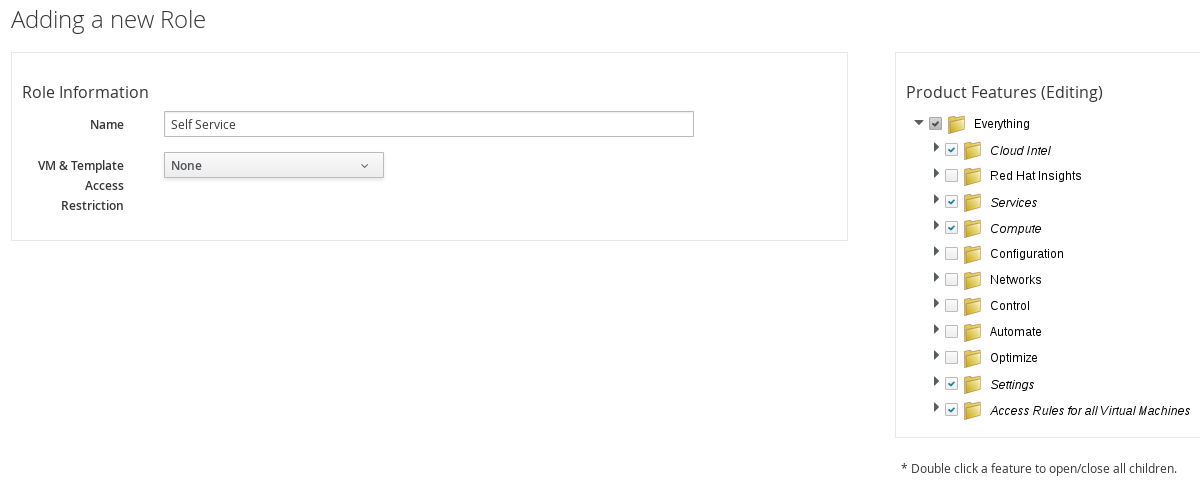
Navigate to “Settings”, “Configuration” and click on “Access Control” in the pane on the left. and then click on “Roles”. Add a new role by clicking on “Configuration”, “Add a new Role” name it “Self Service”. Granting privileges to the role is very nicely implemented. The tree on the right represents all the menus and actions a user can perform in the UI. Enabling (checking) a feature grants the privilege to the role. By drilling down into sub folders, very fine grained permissions can be granted (e.g. power on, but not power off).
For the purpose of this demo, a role with full access to “Cloud Intel”, “Services”, “Compute”, “Settings” and “Access Rules for all Virtual Machines” - but no other privileges - is created.
Example Group “Engineering”
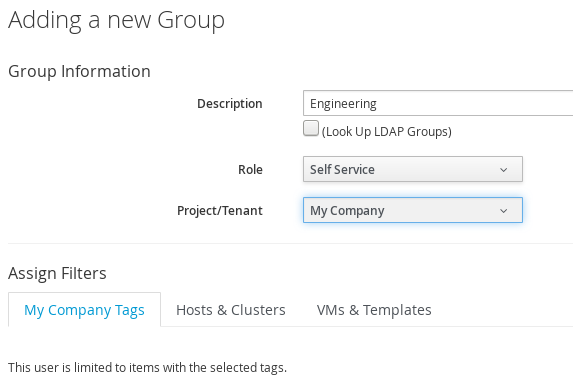
In the next step a group called “Engineering” is created. All members of this group will have the role “Self Service” assigned, which was created in the previous step. For now, we skip tags and filters and keep them all unchecked.
Example user Joe Doe
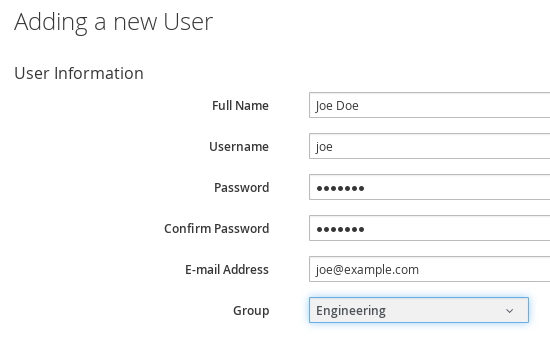
In the last step a user “Joe Doe” is created. This will be a local user (stored in the database) and is a member of the Engineering group.
Results
If Joe Doe logs into the web interface and navigates to Providers, Hosts, Virtual Machines or Service Catalogs he will see all existing objects. When the user was created, he was assigned to a group which doesn’t have any restrictions on visibility, so this should not be a surprise.
Granting access to individual objects
Joe Doe can now see all objects in the Web UI. Since Joe Doe is a member of the Engineering Department, we want to restrict his visibility to VMs associated to Engineering. To accomplish this, CloudForms/ManageIQ needs to know which VMs are part of the Engineering Department. This can be done by tagging those objects. But first, let’s restrict Joe Doe to only see objects tagged as Department/Engineering.
Navigate to the group, edit it and select the Department/Engineering Tag.
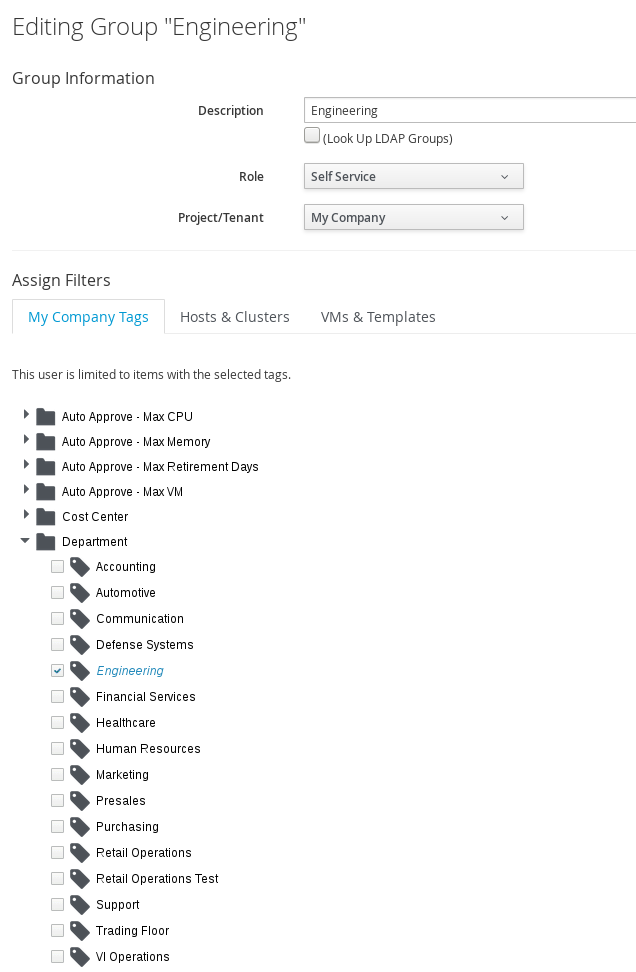
When changing groups, roles or tenants, the user doesn’t need to logout and login again. Changes are reflected on the next reload of the UI. If Joe reloads the UI, he will see no Virtual Machines or other objects anymore! The scope for the group and hence the user, was just limited to objects which are tagged as Department/Engineering - and no objects have been tagged so far.
An object, like a Virtual Machine, a Host, Data Store etc. can be tagged by using the “Policy”, “Edit Tags” menu. After tagging a Virtual Machine and reloading the Web UI as Joe Doe, the VM will show up in the user interface.
This works the same way for all other objects. If Joe Doe should be able to order a specific item from the service catalog, the item (or bundle) has to be tagged with the Department/Engineering tag to make it visible.
First Gotcha!
You might have noticed, after setting the Department/Engineering Tag for the Group, no objects are showing up in the UI. This means, all relevant objects which should be visible for the user, must be tagged. As soon as you start using tags, you have to use them consistently.
Working with multiple tags
If a Virtual Machine or any other object has to be visible to multiple Departments, it’s solved by just adding all the necessary Department tags. Adding the Department/Finance tag to a service catalog item, makes the item available for order to members of the Finance team.
Tags in the same tag category are logical OR relationships. If at least one tag of the list of group tags in this category matches with at least one tag of the category of the target object, access is granted. In this example, if a user is in Department/Finance OR Department/Engineering, he or she will see the object. Users which are not in Engineering or Finance, will not see the object. This also applies, if the object isn’t tagged with any Department tag - which means, nobody will see it.
Second Gotcha!
This also includes Super Administrators! If you restrict visibility of Super Administrators by assigning them tags, they will no longer see those objects which they don’t have matching tags for! Since Super Administrators can always fix tag assignments (or remove the tag filter for their group), they can restore full visibility. But better make sure you never limit Super Administrators by accident…
Working with multiple tag categories
When working in more complex environments, multiple tag categories have to be used. For example, tags can be used to separate Virtual Machines from different stages (Development, QA, Production), or different tag categories could be used to be more granular by granting access to service catalog items.
As soon as multiple tag categories are introduced, things get a bit more complicated.
Third Gotcha!
When using multiple tag categories, there is a logical AND between tag categories. This is probably best explained with an example. There is already an example tag category called “Environment” with tags associated like “Development”, “Production” and others.
If the group “Engineering” of which Joe Doe is a member, gets the additional tag Environment/Development assigned, Joe can only see objects which have the Department/Engineering AND the Environment/Development tag assigned. A Virtual Machine tagged as Department/Engineering and Environment/Production will be hidden from Joe.
This is very important and is often causing confusion. As soon as you start tagging objects of your infrastructure with tags of different tag categories, the logical AND comes into play!
Tags in the context of tenants
Tenants can be used to go even one step further when it comes to isolation and separation of the virtual and cloud infrastructure. Tenants can be nested and can also have projects as child elements. When working with tenants, it is important to remember that they limit also the visibility of objects.
If Joe Doe moves into a new tenant, he will only see objects like Virtual Machines, which are owned by this tenant or one of its sub tenants. Tags are filtered with logical AND. This means, Joe will only see objects which are part of the tenant or any of the sub tenants AND are tagged appropriately. Objects which are owned by a parent or sibling tenant will never be visible to Joe, even if they are tagged with the proper tag (in this example Department/Engineering).
Conclusion: Think before you tag
Tags are a very simple and yet powerful way to manage access control lists. Sometimes people tend to over complicate things though and this makes it unnecessarily complicated. There are a few rules we try to follow when we plan tagging:
-
don’t use tags for information which is already available as an attribute: For example tagging all Windows VMs as Operating System Windows and tagging all Linux VMs similarly, is in most cases not a good idea, since this information is already stored in an VM attribute (you can create a filter to find all Windows VMs, you don’t need a tag to do that)
-
try to reduce the number of tags and tag categories: having a large number of categories and tags make things complicated. Think before you add a new tag. Also keep in mind that you might have to tag (again) everything you already have (remember, logical AND between tag categories)
-
try to use auto tagging: instead of manually tagging the infrastructure, try to write some Automate Code which does it for you. For example during provisioning time.