I was working on a script to add additional disks to existing virtual machines running on Red Hat Enterprise Virtualization (RHEV). I did find some code original written by Eduardo Minguez which I just polished a little bit. Thanks to him I published the full code on Github under the terms of the GPL.
There are actually multiple steps to build a user friendly way for adding the virtual disk:
-
create an additional button for the VM object
-
provide a dialog to select disk size, data store and allocation policy (thin vs preallocated)
-
select from a list of available datastores created by a dynamic dropdown list
-
the actual code which adds the virtual disk to the VM
The code was tested on CloudForms 4.0/4.1 and RHEV 3.4 - but it should work with other versions and the respective OpenSource Projects too.
Automate Code
There are two methods to implement this functionality. The first method “dialog_add_disk” will provide a dynamic drop down list from which the user will be able to select one of the existing RHEV data stores. The new virtual disk will be created on the selected storage.
The second method “hot_add_disk” will parse this information plus the other settings provided by the user (allocation policy and size) and create the virtual disk.
Both methods can be found on Github.
Service Dialog
The second step is to create a service dialog which asks the user for required information. If you create the dialog manually, make sure the field are using the proper names, or the “hot_add_disk” method will not be able to find the values.
-
“size”: and integer value of the new disk size in GB
-
“datastore”: the name of the data store, ideally coming from a dynamic dialog
-
“allocpolicy”: allocation policy, possible values are “thick” or “thin”
For your convenience I exported my service dialog and put it on Github too.
Button
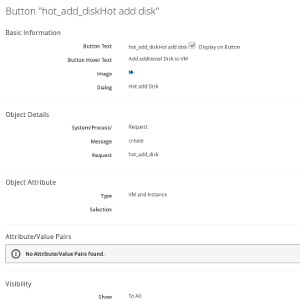
To put everything together, a button has to be created and associated to virtual machine objects. For the button it is important to specify the correct value for “System/Process” which should be set to “Request”, and the request name which has to match the name of the instance. In the provided Automate export the name of the instance is “hot_add_disk” which has to be put into the “Request” field.
A few words about the code
The “dialog_add_disk” method has probably two blocks worth describing. The function “getstorages” will use the provided host name and credentials to retrieve a list of all available storage domains. This list is filtered by type “data” to exclude ISO and Export domains. The resulting list of storage domain is stored in an array which later stored in the $evm.object to populate the dynamic dialog fields.
The second noteworthy code block is the following section:
1vm=$evm.root['vm']
2ext_mgt_system = vm.ext_management_system
3rhevmhost = 'https://#{ext_mgt_system.hostname}'
4rhevmuser = ext_mgt_system.thentication_userid
5rhevmpass = ext_mgt_system.authentication_password
This piece of code does first retrieve the VM object (from which the button was clicked) and will then retrieve the details for the management system. This object does contain the host name and credentials to communicate to the provider. This is a nice way of retrieving those credentials from the internal database instead of hard coding them or providing them in the instance attributes.
